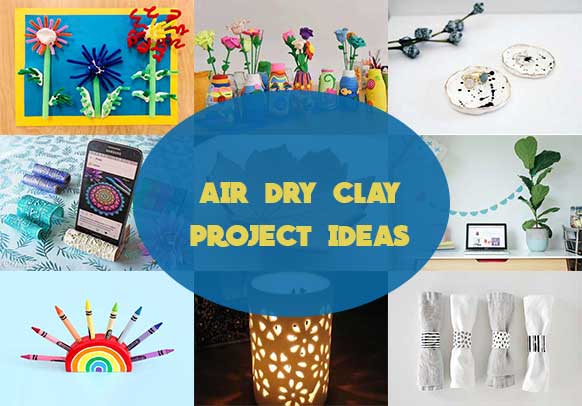
Air Dry Clay Ideas: Top Projects For Beginners
What’s the earliest memory of childhood you can recall?
If you are having a flashback to the times when you used to have fun making random things out of Play-Doh while sitting in your grandma’s den, then congratulations!
Your childhood was awesome!
However, none of the things that we made lasted long as play dough is known to get weakened over time and crumbles to pieces eventually.
That’s why a better alternative to this material is to use air-dry clay, which allows you to mold the material into practically any shape you want, is much more durable and most importantly, totally RECYCLABLE!
Another big advantage of this material is, unlike traditional ones, air-dry clay doesn’t need to be heated in order to get cured.
You can dry this material at normal room temperature and enjoy making versatile craft projects including planters, pots, bowls, kid’s toys and many more accessories of your choice.
Want to get inspired by some of our easy-to-make air dry clay project ideas?
Let's give you a tour of all the necessary supplies you need to collect first!
Table of Contents
Things You Need To Get Started With Clay Projects
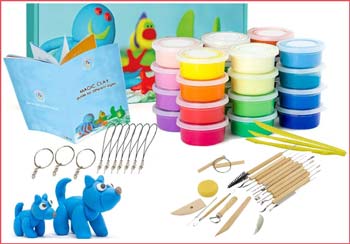
1. Air-Dry Clay
Obviously, this is the first thing that you need to gather!
However, there are different types of brands available in the market. While choosing a particular brand, make sure to check whether the clay has a non-stick formula as it will help create fine details on your craft project more easily.
If you are planning to involve kids in making these crafts, then go for a lightweight clay, which is also available in different colors to make the projects more vibrant and colorful.
2. Cookie Cutter
Seems like cookie cutters are good for just about any project you have!
To make your craft projects look more realistic, you might need to cut out different shapes and patterns from the clay while it's still damp. Instead of forming your own shapes, you can use the cookie cutters to help you out!
For instance, you can spell out a nice message with the Alphabet cookie cutters or make wall ornaments with the Moon-cycle Cookie Cutter Kit quite easily.
3. Rolling Pin
This is one of the essential tools for most craft projects out there!
So, the first thing that you need to do after taking a good chunk of clay in your hands is to get it flattened to the surface.
And that’s where the rolling pin comes into play!
It helps you to get any thickness that you want out of the clay and smooths out all the rough edges nicely.
If you want your projects to be more unique, then it’s better to get an embossed rolling pin that has raised pattern all over its surface, which allows you to have more fun while crafting!
4. Knife
Once you are done rolling out the clay and satisfied with its thickness, you need to cut the desired piece out of the rest of the material.
And that’s when the good-old steel knife helps us by making the cut that we need!
Any regular knife is good enough for this type of crafting as clay is quite easy to cut through when they are damp.
5. Acrylic Paint
If you have decided to purchase a regular white-colored clay and now want to add some color to your projects to make them look more vibrant, then using acrylic paint is your best option for this type of situation.
Acrylic paint comes in a variety of colors and they dry fast. They also look great on air-dry clay and add a different texture to your projects. Select right acrylic paint brushes from our list that will help your make perfect shape on your design.
6. Wooden Board
Clay, in general, is a sticky substance.
So, if you want to get a productive result, you need to set up a non-sticky workspace to work comfortably.
Although you can just put a wax paper on your desk and work on your projects on top of it, it’s best to invest in a solid wooden board if you are looking for a long-term solution.
20 Easy Air Dry Clay Ideas To Keep You Busy This Holiday
1. Welcome Fall With A Decorative Leaf Bowl

Autumn leaves come with beauty, color and a subtle tone of magic in the air.
As much as we love the winter-crisp leaves with all its fiery-red appearance, the inevitable truth is we must let go of our beloved season as winter descends.
However, I believe in keeping the things that you love close to your heart and hence comes the idea of making an autumn leaf bowl as a memento!
To make this leafy bowl, first, flatten the air-dry clay with the rolling pin to approximately ¼ inches in thickness. Then, place the leaf that you collected (make sure it’s big and veiny!) on top of it keeping the veiny side down, press on it and trim the excess part away.
Leave the craft in an oval-shaped bowl overnight and let it harden on its own. You can also paint it any color you want afterward to finish the complete look.
2. Get Stylish With A Beaded Necklace
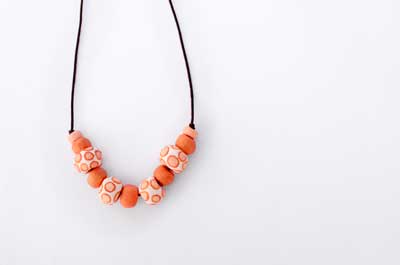
Your jewelry wardrobe is kind of lacking a splash of color, don’t you think?
If you are in a playful mood and want to give your outfit a charming vibe, then a colorful beaded necklace is your best bet as its unbeatable in that arena!
And the best part is that it’s super easy to make!
At first, you will need small balls of clay rolled up to different sizes of beads. Next, use a stick to punch a hole in it.
Then, start coloring the beads in whichever color you prefer. If you want something unique, then instead of going for solid shades, we would suggest mixing and matching 2 or 3 shades together. You can also draw different patterns on them if you want.
After the paint is all dried nicely, thread the balls onto a string and have fun wearing it with a matching outfit!
3. Make A Mini Planter For Your Succulent
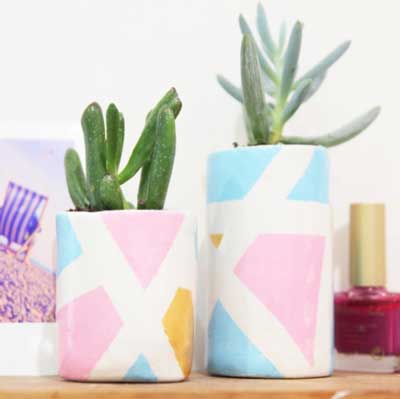
Succulents are one of the easiest plants to grow indoors due to their low maintenances. Especially, if you have got an Aloe Vera in your home, then you are already familiar with its numerous medicinal benefits along with its majestic appearance!
Instead of the regular pots, our next idea suggests you to use something different, something extra-special to enhance the beauty of all those adorable mini succulents in your home!
To make these DIY planters, you will need a cardboard tube as a base. Start with wrapping the clay all around the tube and add water to soften it up if necessary.
Once you are done with the round shape, press the tube on top of a flattened piece of clay and cut around the edges to make it fit perfectly.
Pull the cardboard out of the mold gently and let it dry.
Paint if you want and give your little succulent buddies the treat they deserve!
Related: Know Common Mug Decorating Ideas
4. You Can Never Have Enough Pair Of Earrings, Right?
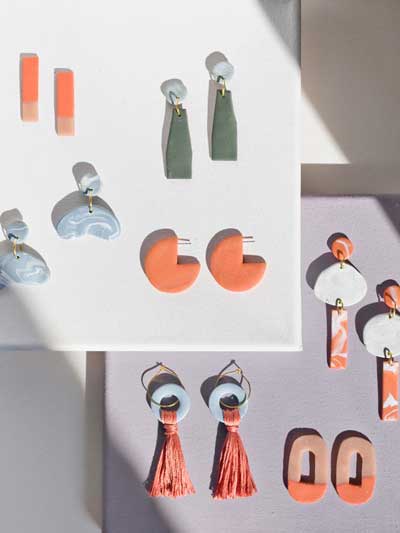
Whether it’s a big hoop, dangler, drop or just a stud earring, each one of them creates a unique appearance and makes you look even more beautiful!
Well, if you want to turn heads with some drop-dead gorgeous earrings, then you, my friend, have come to the right place!
So, basically, there are a lot of ways to make earrings. If you want to make Three-quarter earrings, then we suggest using a cookie cutter to cut out a round shape and then crop out one-quarter of the circle.
To make a knotted one, you gave to roll out a long thin slice of clay and twist the ends together to give it the shape you want.
For a tasseled look, you can add an embroidery floss to a large hoop and let it dry before adding your favorite color to it and get ready to look extra-pretty on your next big event!
5. Say Hello To The Most Awesome Keyring
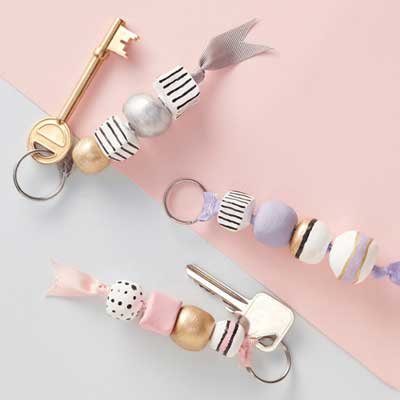
It’s time to level up your game with our all-new air-dry clay keyrings!
Toss and turn the earthy material until it takes into the shape of small, round-shaped beads. You can make any shape you want including square, dice-shaped, hexagonal or whichever you prefer.
Using the sharp edge of a stick, create a hole in the middle of each piece. Then leave them alone for a couple of hours until they have dried out completely.
Once the beads are all hardened and ready to be threaded, paint them in different colors and draw your favorite patterns on the surface. With the help of a colorful ribbon, attach 4-5 beads on one string and tie a knot to keep it secure.
Done?
Don’t forget to add a beautiful golden keyring at the end to complete the whole look!
6. Give The Crayons A Home To Live In
Kids love coloring!
They will color on paper, white wall, your cloth or even on the fancy bedsheet that you laid out for a special event in your house just for today!
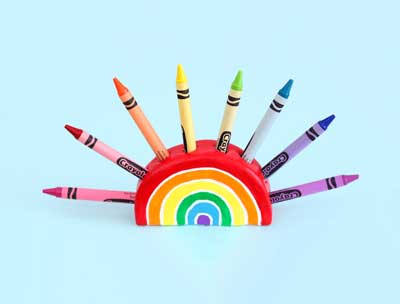
While we don’t stand a chance in front of their bundle of energy, we can, however, keep them busy in a different way by making a pretty crayon holder to keep their colors inside it once they are done playing!
To make the crayon holder, start shaping your clay into a semicircular shape that has about one inch of depth inside it. Depending on how many colors you want it to hold, use the crayons to punch hole inside the mold.
Keep adjusting the shape of the holder until the bottom gets all nice and smooth!
Remove the crayons from the mold, smooth out the edges and let it dry overnight to reveal a rainbow color-pencil holder the next day!
7. Simple, Yet Functional Photo Stand
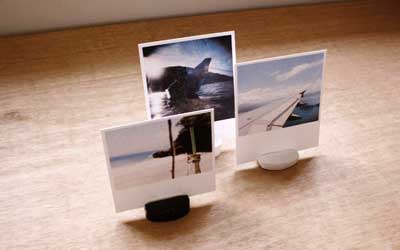
Moments that you captured out of a plane window, picture of a ship on the sea or even the shot of an empty Coca-Cola bottle on a beach can give your living space an entirely different look making it warm and more inviting!
You just need the perfect photo-stand to go with these pictures!
Instead of rushing to the mall in order to purchase expensive photo frames, you can make some easy photo holders at home under 10 minutes!
Just take a lump of clay and start molding it into a flat triangular shape. Then, make a vertical line in the middle that’s deep enough to hold your photo inside it. Carefully, smooth out the edges with a damp cloth and let it dry overnight.
That’s it! Your brand-new photo stand should be ready to get set on your dining table in the next morning!
8. A Garland That Lasts Forever
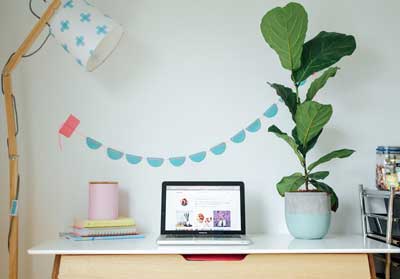
With festive seasons coming right up in the corner, it’s often a hassle to find new ways to decorate your house every time!
May I suggest an easy alternative that can be reused as many times as you want?
A garland made out of clay would be perfect for decking up any empty space of your house on special occasions including kid’s birthday party, housewarming party or any kind of festivals!
And the best part is, it’s easy to make, inexpensive and can be stored for future use as well!
To make this awesome ornamental garland, first, you need to roll out a small piece of clay to an even thickness of 4 millimeters. Then, cut the material into a half-circular shape and smooth out the edges as much as possible.
Punch two holes on the opposite side of the half-circles and color them with acrylic paint once they become dry.
Put a string in between the holes and this everlasting garland is all ready to rock your wall!
Read More: Decorate your house using balloon with our ideas.
9. A Ring Bowl To Keep Your Jewelry From Getting Lost
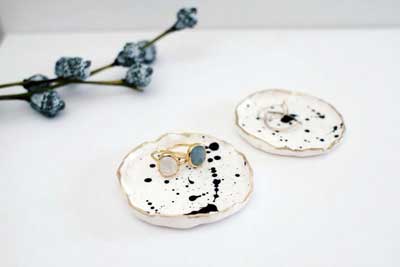
The smallest items are the hardest to keep track of.
A tiny ring, small pendant or even an expensive stud earring can go missing in the blink of an eye if you fail to keep them in their respective places and cause you to get upset over it the next morning!
That’s where a ring bowl comes into play!
To make this jewelry bowl, first, you have to shape the clay into a bowl-size with the help of a rolling pin. Don’t worry if the bowl ends up not being in perfect round shape!
After the material has hardened enough, you can color it with acrylic paint.
For the best result, lighten up the shade with a little bit of water and use a bristle brush to drip the colors over the bowl’s surface.
10. A Great Addition To The Dinner Table
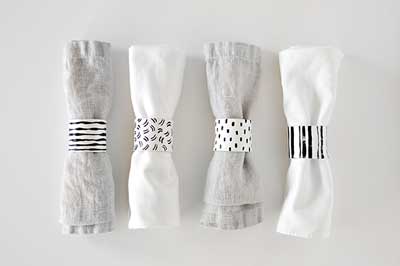
Since 19th-century napkin ring has been used as a prop for holding the table napkins in place as well as adorn our dinner table and make it look more sophisticated.
If you are in the mood for spending a little time and effort on our next idea, you will be surprised to realize how easy it is to make these rings at home!
You will need a white-colored clay and a cardboard tube (Toilet paper roll would do, but make sure to cut it in half) for this purpose.
Get the clay flattened to be about 1/8 inches of thickness. Then, keep wrapping it around the tube until the ends of the clay overlap each other and make a cut right at that point.
Let the ring dry overnight and get creative with a sharpie and acrylic paint to draw different patterns over it the next day!
Your very own customized napkin rings are ready to use!
Also Read: Felt Craft Project Idea For Beginners
11. Get Creative With The Flower Vases At Home
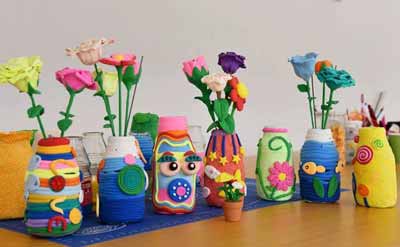
The store-bought flower vases are so boring and yesterday!
That’s why we suggest replacing the regular vases at your home with our hand-made flower pots, which are super easy to make and turns out to be a cool addition that goes well with any interior!
Have some old mason jars in the kitchen?
Good! You will need one for this project.
Start by kneading the clay properly and wrapping it around the mason jar to cover its entire surface. Next, use little pieces of clay to make different patterns and stick them onto the surface to make it look more interesting.
Then, wait for 24 hours to get the vase all nice and dry before painting them with a color of your choice.
That’s it! You can use this flower vase to store fresh flowers with water inside it as well!
12. Let All The Lunar Phases Come To Your Home
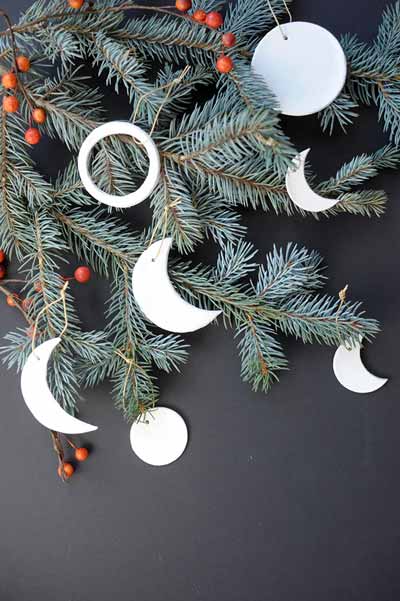
Moon changes its appearance over time.
Sometimes the full moon decides to appear with all of its majestic beauty up in the sky! And then there’s the first-quarter or three-quarter phases, where the moon plays hide and seek with the clouds and reveal itself in front of us only when it wants to!
If you love the lunar phases as much as I do, then let’s take a look at how we can make a DIY moon ornament with an earthy material and hang up on a tree as a decorative piece as well!
Start by flattening the clay with the rolling pin to an even thickness all over the surface. Then, with the help of a cookie cutter, cut moon-shaped pieces from the clay and make a hole on top to hang it from the tree.
Let the pieces dry overnight and deck up your wall or tree with these beauties the next morning!
13. Rule A Magical Kingdom Where Only Happiness Exists
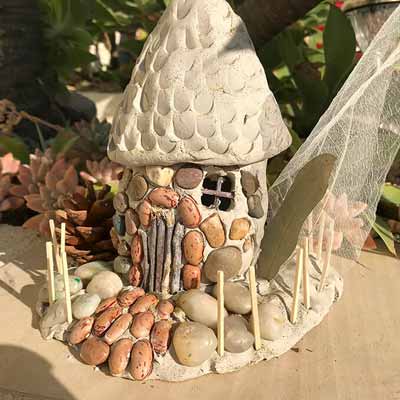
Your toddler is going to love this one I bet!
We are going to make a cute little fairy house for this project.
Come on! How cool is that?
First, we will need a solid ground for the house to stand on. Involve your kids to add lots of texture on the base and make it look a bit crumpled on purpose.
For the walls, we would suggest using a flattened piece of clay with half-inches of thickness, curl the piece inwards into a round shape and place it on top of the base firmly.
As for the roof, you can make a cone-shaped clay-dough and attach it on top of the wall to make it stay upright.
Once the basic structure is done, you can cut holes in the middle with a skewer and make tiny doors and windows.
Don’t forget to keep them low-key, otherwise, the whole structure may come tumbling down in an instant!
14. Little Treasure Boxes To The Rescue!
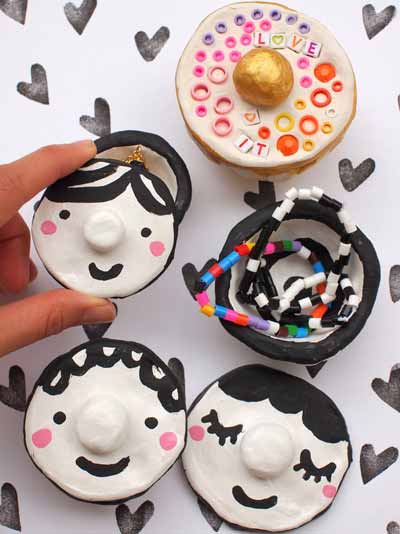
When it comes to collecting random things from the street, children hold the medal as an all-time winner!
And to encourage this positive attitude even further, we have decided to show you how to make a fun treasure box to keep all those collectibles inside!
To make the box, first, take a good amount of clay in your hands and start kneading it to a large ball. Make a hole in the middle and keep stretching it in width until it’s good enough to be used as a storage.
Now, it’s time to work on the lid!
Take another ball of clay and flatten it in the shape of a lid. Make sure the lid fits perfectly on top of the box and let it dry.
Depending on how thick the box is, you might have to wait for 3-4 days before painting over the surface and add decorative embellishments of your preference.
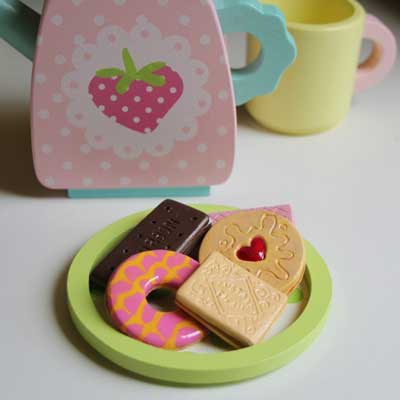
15. Cookies And Donuts For The Tea Party
The best way to bond with your kids is to participate in everything they do!
Does your baby girl love the idea of pretend-tea-parties at home?
Excellent!
Our next idea is sure to keep her engaged for a long time as we are preparing for a cute, adorable tea party with yummy cookies, biscuits and donuts with berry frosting on top!
To make the biscuits, you need to use a cookie-cutter and knife to cut out different shapes and sizes including round, square, heart and donuts from a ball of rolled-up clay.
Then, use a toothpick to add intricate details on top of the pieces and make them look more realistic!
Finally, once they are all nice and dry, paint them with different colors like Dark Chocolate, Cream, Pink, Red and Pale Yellow, put them on a nice plate and spend a fun afternoon with your little one!
16. Make A DIY Romantic Lantern
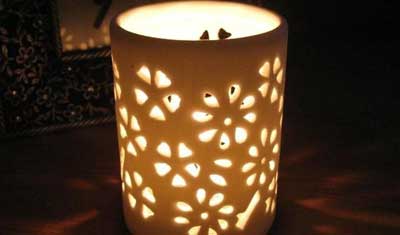
You don’t always need to buy an expensive present for your significant other to set up the right mood!
Sometimes, a nice homemade dinner, flower bouquet and a DIY lantern spreading a subtle message of love all over the space are all you need to get both of you on the same page!
To make the lantern, take a nice chunk of clay and start rolling it to a flattened piece that's about 0.5 centimeters in thickness.
Then, use a skewer to create petal-sized holes to make a beautiful flowery lantern!
Wrap the clay piece around a big jar to give it a cylindrical shape. Make a flat base using a small chunk and carefully stick the cylinder on top of it and press gently to get it attached.
Once it’s dried up, you can put a candle inside and enjoy a soft, romantic evening with your loved one!
17. Let Your Hands Take Rest With A Phone Holder
You know what freaks me out more than losing my wallet?
If I can’t find my phone for a second!
Yep, today we are that generation who are unable to keep their hands away from the mobiles for any longer than 10 minutes!
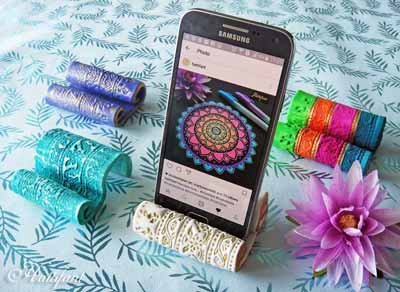
So, today I have decided to teach you how to make a phone holder with some quick easy steps!
Start by taking a good amount of clay and making it flat with the help of a rolling pin.
Once you have reached a ¼ inches of thickness, cut the sides of the material with a knife to turn it into a rectangular shape. You can also make some intricate designs using a needle.
Once you are done, turn both sides of the piece in a way that they meet halfway while leaving a small space in the middle to hold your mobile inside it.
Let it dry, paint and enjoy reading the rest of this article while setting your mobile inside the holder!
Also Try: Top 12 DIY leminator project list
18. A DIY Sea Shell Pencil Holder
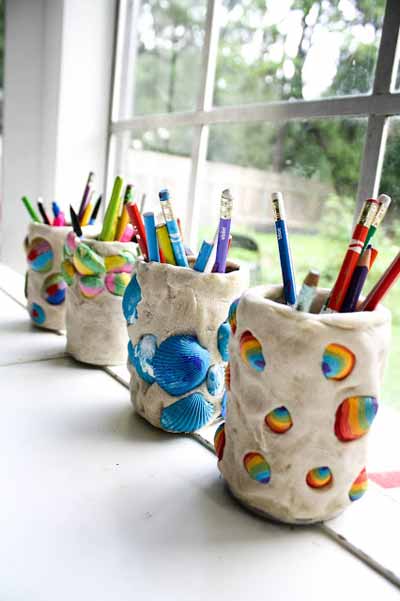
Remember the seashells that you picked up from the beach last summer?
Well, it’s time to put them into good use!
So, first, you have to make a cylindrical shape and a flat bottom for the pencil holder. To do this, we suggest using a mason jar as a prop for getting the cylindrical shape right.
While the surface is still damp, start pressing the shells firmly onto the surface. Although you can use shells of any sizes here, we recommend going with the smaller ones as they are easier to press down and won’t cause the holder to tumble down all of a sudden.
Done?
Let it dry before you start organizing your pens and pencils inside it and showcase your newest desktop accessory to everyone in the office!
19. An Imprinted Dish For Someone Special
Shout out to all the people who hate to go shopping and end up making gift purchases at the very last minute!
As we all know last-minute decisions aren't always praiseworthy (read it’s a disaster!).
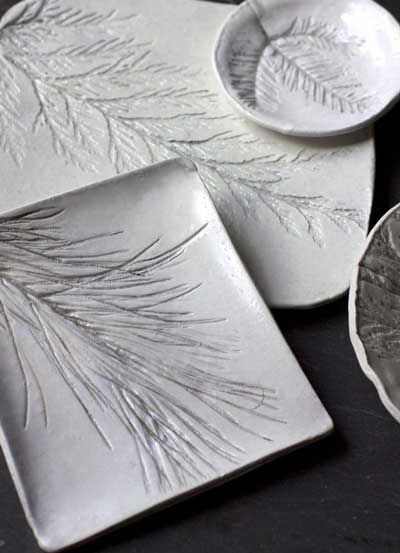
So, we have decided to help you out by teaching you how to make a decorative dish for presents in three simple steps!
Depending on how big or small you want your dish to be, first, take an appropriate amount of clay chunks on a smooth surface and start making it flat with a rolling pin.
Next, take a large tree branch and place it on top of the now-flattened piece to make an everlasting imprint on it. Make sure to press hard to get all the good details!
Lastly, wait for the dish to get hardened.
There! Now it’s all ready for you to paint over the surface and gift it to your dearest friend!
20. A Fun School Project To Craft!
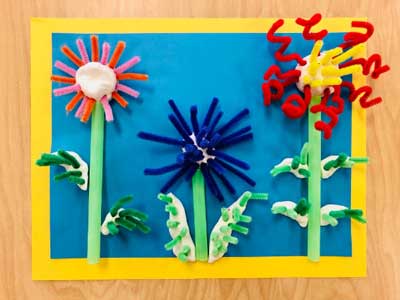
Looking for inspiration for your kid's school project?
How about a miniature flower garden made out of clay?
But no cheating! Promise to involve your kids while making this amazing DIY flower garden project and watch how they confident they become at the end of the day!
So, what does a flower have?
Leaves, stem and a big center in the middle!
Start making all those parts with clay by shaping them in between your hands. Take a construction paper and put all the different parts of a flower in their respective places.
To make the project a bit more interesting, we suggest using plastic straws and pipe cleaners to make all the fine details. However, it’s just a suggestion and you can finish the whole thing with only using clay if you want.
Once it’s all done and dry, sit back and ask your kid what he/she learned from this project before submitting it to the school for a better learning experience!
Tips For Crafting With Air Dry Clay
Final Words
Just like our body needs regular exercise to stay fit and healthy, our mind needs some challenges to keep on top of its game!
The art of making different objects with air-dry clay not only boosts your brain activity but also, it helps you release any repressed emotion that you may have had and reduce stress from your life at the same time.
Hopefully, our air dry clay ideas have inspired you to get engaged in some fun pastime activities, find your inner spirit and overcome any stress or anxiety you may have in your life with a positive and happy attitude!

