How to Make Car Decals with Cricut & Which Vinyl Need To Use?
Everyone wants their car to look exquisite and stylish that can turn heads. If you see a nice car, with beautiful graphics, you will more than likely stop and stare a few seconds.
Cars are a personal thing that many people consider an extension of their personality.
And what better way to show off your style and artistic side, then using car decals?
Car decals can transform the entire look of the car, giving it a more rugged or sleek appearance depending on your design choice.
However, getting a decal job done professionally costs quite a lot. But what if you could do it yourself at home with access to some easy to find, and inexpensive equipment.
If you are wondering how you can do this, well, we got your back. In this article, we will take a look at how to make car decals with Cricut and will also give you a quick rundown on what vinyl you should use for this purpose.
Why Would You Wrap Your Car?

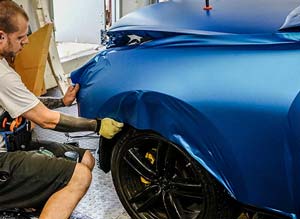
Nowadays, it is almost hard to tell if the perfect finish you see on a car on the street is wrapped or painted. It's obvious when somebody is using vinyl wrapping on a racing or drift car, because the design usually has a lot of advertising.
But when it is a simple single color without ads, it's very difficult to tell the difference between a painted and a well wrapped car.
It's much cheaper to apply, and can also be removed. For this reason, more and more people are opting to go for decals as opposed to multiple layers of painted coatings.
And there is a good reason for that. If you are still unsure about whether wrapping your car is the way to go, the following section of this article is for you.
Durability
Firstly, wrapping your car offers you a durable look that does not wear easily. Since the wrapping still contains an inner coating of paint, it just means added security.
Artistic Freedom
While you could paint your car with a solid or glossy color, if you want true artistic freedom, vinyl is the way to go. Especially if you want to create a two tone or even more complex graphical design, you will have a hard time painting it. Vinyl wins in this case.
Time Efficiency
Applying for a new paint job on a car is a time-consuming process. It can take anywhere from one to two weeks, depending on the complexity. On the other hand, applying a vinyl wrapping takes five days at best, making it a much more time-effective option.
Easy to Replicate
If you own more than one car and want the same graphics on all of them, vinyl wrapping is the way to go. If you paint each car individually, you will likely not be able to recreate the exact design.
Easy to Revert
Taking off the vinyl wrapping is not that difficult or complicated. This means, if you get tired of the wrap and want to try something new, you can easily do that without harming the inner paint.
Easy to Maintain
Wrapping your car with decals can also make maintenance duty a whole lot easier on you. If you paint your car, it needs regular waxing and polishing to maintain that impeccable finish.
How to Make Car Decals with Cricut
There are many ways to create a car decal by yourself. However, it might take you some attempts before you can get better if you are making it by hand.
However, with a cricut cutting machine, this task can be easy even for a beginner. Especially with our instruction to help you along the way, you would be making car decals like a pro in no time.
Before we dive into the steps, let us quickly go through the things you need to make car decals with Cricut.
With all the supplies in your hand, now you can proceed to make your very own car decal using Cricut.
Step 1
The first step is to select and prepare your design. If you prefer to use preset graphics, you can find a ton of them in Cricut Design Space. You can even upload your own design if you want to use it.
For those who go with the preset options, they can simply print it out and skip over the next step. But for those who want to use their own image, follow step two.
Step 2
Start a new project in the Cricut Design Space. Click on the upload button located in the left sidebar. You will find a window where you can simply drag and drop the image file that you want to print.
On the right side, you will also be prompted on whether the image is simple, complex, or moderately complex.
Now you have to select the parts of the image that you do not want in the final print. The sections you select will be erased from the final output.
Once you are done making changes, you can check a preview before going for the print. If everything is in order, you can proceed to the final window.
When you click next, you will find yourself back on the first screen, but now you will also see your design.
You can make final size adjustments and set the directions of the design by pressing the Insert Image option. If everything is okay, print it out and head on to the next section.
Step 3
The next step is to cut the vinyl according to your design specification. Load the ink jet printer with the vinyl of your choice and let the Cricut do its thing. Once it is done, make sure to remove the excess using the weeding tool.
Step 4
Now might be a good time to prime the surface where you want to place the decal. You can use alcohol and a rag to clean the surface thoroughly as it will get rid of any grease or fingerprints. For the best effect, you want a clean base.
Step 5
With everything set, take your transfer tape and place it on top of the vinyl. The tape will allow you to transfer the vinyl safely to the car without distorting the image.
Step 6
To apply the decal, slowly peel off the vinyl paper making sure the design is intact. It is best to go slow at this stage, as it is very easy to mess up if you force it.
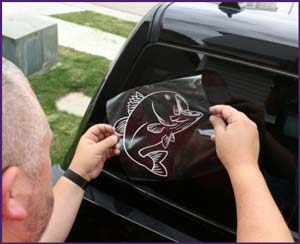
Carefully apply the vinyl on the car by starting at one end and slowly laying down the rest. You should go for a steady rolling motion to ensure even placement, checking for air bubbles every few steps.
Step 7
If you find any air bubble, you can push it out using the scraper tool. Do not panic, it is absolutely normal to have a few air bubbles, and they are also quite easy to handle.
Voila, you have successfully created your first car decal. With everything out of the way, you can now simply peel off the tape and enjoy your handiwork.
What Vinyl to Use for Car Decals

When choosing the best vinyl for car decals, you have a few different options. You need to consider the surface where you will apply it and also how long you want it to last.
Keep in mind that your decal will be exposed to many different weather conditions such as rain or snow.
On top of weather elements, it also needs to hold up against detergents for when you are giving your car a complete wash.
With all things considered, your best options would be Oracal 651, 751, or 951. All of the vinyl is permanent outdoor vinyl and make great choices for using as car decals.
Because of their strong adhesive, and silicon-coated surface, they can also survive hazardous weather conditions relatively well.
They are also water-resistant and happen to come in a variety of different color options. As a result, they are a great choice if you are going for whacky designs.
Additionally, it is also quite easy to slice through, allowing you to easily shape them according to your needs.
Since the body of a car requires you to wrap around the corners, you can do it easily using this vinyl. Furthermore, they are also quite easy to remove if you ever want to get rid of the decal.
The main difference between the three vinyl is mainly the price and longevity. The 951 gives you the most lifetime; however, on a budget, the 651 is probably the best choice. Ideally, the 651 lasts about six years, while the 751 will last around eight years, and the 951 will survive for around one year.
You can also apply this vinyl on window decals. Due to the strong adhesive backing, they will stay on strongly without any issue. This speaks highly about the versatility of the vinyl.
However, the Oracal 651 does not work well with long exposure to sunlight. If your car stands on the outside all day long, it might not be the best option for you.
Over the years, you will see the decal shrink until, at some point, you need to consider a replacement.
If used carefully, the decal will stay looking new even after three or four years. So try to park your vehicle in a place where it is not exposed to too much sun.
Although it might be annoying to replace it every now and then, since it is so affordable, you might not have to worry too much.
Tips & Safety Issues When Applying the Car Decal

Before you go ham with your artsy decals on the car, you should slow down and check if everything is in order.
Remember that it is a delicate process that requires focus and a calm mind. We believe that the following tips will greatly help you out when applying the decal on your car.
Take measurements
Start off by taking some measurements of the decal and comparing it with the area of your car. You can use a tape measure for this purpose. If you have a clear understanding of the area you are working with, it will make the application process way more manageable.
Clean the surface of application
Before you apply the decal, make sure the surface is spotless. Contaminants on the surface may reduce the longevity of the sticker, and you might need to replace it way earlier than usual.
For a fresh surface, you can either use soapy water or a combination of rubbing alcohol and water.
Word of caution, stay away from any window-cleaning products, as they tend to leave behind some residue.
It will end up reducing the effectiveness of the adhesive of the decal. If you are using soap, rinse it thoroughly with water until you get a clean surface.
Work in a moderate temperature
It is best practice to work with decals when the temperature is moderate. For the best results, park your car away from direct sunlight when working on the stickers. Also, try to ensure that the temperature is between 50 to 90 degrees Fahrenheit.
Masking tape and the wet method
For those struggling to get the perfect positioning, masking tape really comes in handy. You can use it to fix the edges of the sticker to a specific position while tending to the other sections.
When you have the perfect alignment, you can simply peel off the tape. Furthermore, with masking tape, you can also highlight the position of your decal before applying it, giving you a degree of reference when working.
Another helpful trick is the wet method. After you clean the surface, take a solution of 95% water, and 5% soap in a spray can and spray lightly over the area of application.
As a result, when you place the decal, you have a window of time to reposition it before the adhesive sticks firmly. You can also easily remove air bubbles with a scraper when using this method.
Removing the transfer tape
Although you can remove the transfer tape immediately after applying the decal, we would advise you to leave it to dry.
Waiting for around half an hour will let the tape dry, making the peel-off process much easier and smoother. And the risk of peeling off the design is also drastically low around that time.
If you are working in the winter season, you might have to leave the tape on even longer.
The credit card trick
When you have placed your decal, you might notice some air bubbles on the inside. In our guide, we recommended you keep a scraper tool in hand for this phase.
However, you should know that a credit card works just as well in this regard. If you do not have a scraper, just whip out your credit card and get to work.
Frequently Asked Questions

Can I go through a carwash with the decals?
Yes, you can. However, we recommend you wait a few days and let the decal dry entirely before going to the carwash.
Will the decals damage the paint of the car?
In most cases, the answer would be no. Although if you leave in a sunny region with a high temperature, there might be a slight discoloration around the decal, especially if it was on for a long time.
Is it easy to remove car decals?
The process of removing decals from the car is not that difficult. If you have a heat gun or hairdryer, you can slowly heat the sticker to soften the adhesive. At that point, you can just peel it off slowly, and wash the surface clean of any gum residue.
Which is better? Oracal 651 vs 631?
When it comes to making decals for a car, Oracal 651 is a better choice. It features a more durable adhesive that is suitable for vehicles, whereas 631 works better as wall stickers.
Despite the strength of adhesive, some people did get good results with Oracal 631, especially in colder states.
Are decals waterproof?
No, decals are not waterproof on their own. However, if you laminate the vinyl, they will repel water, oil, or even sunlight. So, if you want your decals to be in pristine condition, laminating them might be a decent solution.
What is the best way to wash a wrapped car?
To wash a car that is wrapped, you should use a sponge specially designed for vehicles or a soft cloth.
After cleaning it, rinse it thoroughly and get rid of air bubbles using a scraper. To dry the wet car, you can use a dry microfiber cloth.
Final Thoughts
There are thousands of options for how you want to show off your vehicle. Now that you know way to make your own decals with cricut machine, the possibilities are practically limitless. Let your imaginations run free and express your wild side.
We hope our article on how to make car decals was useful to you. It should help you bring out your artistic side through your car without spending a ton of money on professional help.
Other Vinyl Related Article:
>> Our Selected HTV for T Shirt
>> Top 10 Best Vinyl Cutter Compassion

